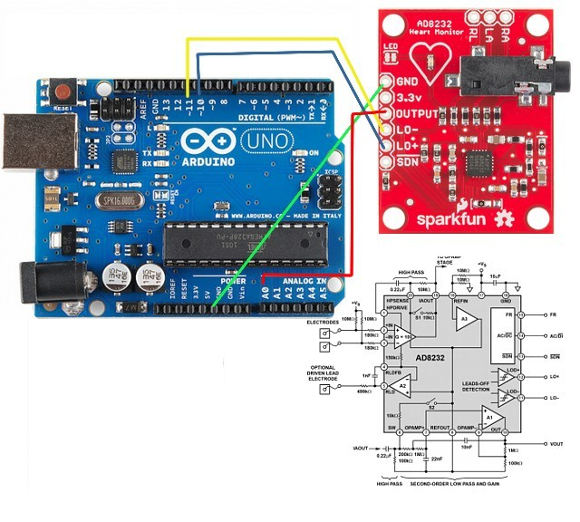
We’ll connect five of the nine pins on the board to your Arduino.
The five pins you need are labeled GND, 3.3v, OUTPUT, LO-, and LO+.
The Device is as default is three-electrode circuit also in DC lead off detecion Mode.
+IN and -IN are connected with two 10M to the 3.3v.
AC/DC comnected to the Ground.
Connecting Headers to the Board
 By this point, you should have the hardware connected and ready.
LOD- or LOD+ pins will be high when the input are not connected.
Original Program for AD8232 Heart Rate sensor.
https://github.com/sparkfun/AD8232_Heart_Rate_Monitor
Note: The code can sketch only through the processing-2.2.1 release.
The device works but results was not so great.
Here my preprocessing program (processing-2.2.1 release)
import processing.serial.*;
Serial myPort; // The serial port
int xPos = 1;  // horizontal
int yPos = 100;
float yOld = 0;
float yNew = 0;
float inByte = 0;
int lastS = 0;
PFont f;
void setup () {
  size(1200, 500);
  println(Serial.list());
  // Open whatever port is the one you're using.
  myPort = new Serial(this, Serial.list()[0], 9600);
  myPort.bufferUntil('\n');
  background(0xff);
}
void draw () {
int s = second();
PFont f = createFont("Arial",9,false);
textFont(f,9);
fill(0);
if (s != lastS){
stroke(0xcc, 0xcc, 0xcc);
line(xPos, yPos+10, xPos, yPos+30);
text(s + " Sec.", xPos+5, yPos+30);
lastS = s;
}
}void mousePressed(){
save(lastS + "-heart.jpg");
}void serialEvent (Serial myPort) {
String inString = myPort.readStringUntil('\n');
if (inString != null) {
inString = trim(inString);
if (inString.equals("!")) {
stroke(0, 0, 0xff); // blue
inByte = 1023; // middle of the ADC range (Flat Line)
} else {
stroke(0xff, 0, 0); //Set stroke to red ( R, G, B)
inByte = float(inString);
} //Map and draw the line for new data point
inByte = map(inByte, 0, 1023, 0, height);
yNew = inByte;
line(xPos-1, yPos-yOld, xPos, yPos-yNew);
yOld = yNew; // at the edge of the screen, go back to the beginning:
if (xPos >= width) {
xPos = 1;
yPos+=200;
if (yPos > height-200){
xPos = 1;
yPos=100;
background(0xff);
}
} else {
// increment the horizontal position:
xPos++;
}
}
}
Leave a Reply