LED Cube 8x8x8
3D LightSquared LED Cube Soldering Steps.
LED Cube found on eBay.
I am not going to talk about the assembly because you can find lots of documents about this issue on the Internet.
I could finish the main board and the soldering of 512pcs LEDs in four days.
The following ICs are used for this issue:
- 8 x 74HC573 U1~U8 DIP-20 8
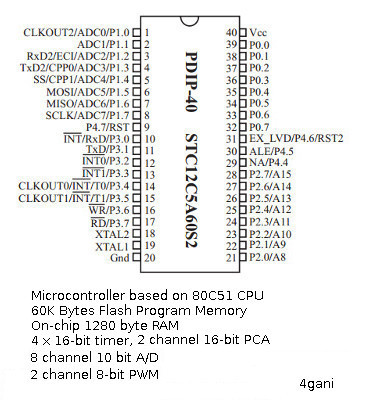
- 1 x STC12C5A60S2(with code) U10 DIP-40 (STC is a Chinese design company)
- 1 x ULN2803
Let’s figure out how the circuit works:
The LEDs are controlled by a STC12C5A60S2 micro-controller. The µC is based on 80C51.
The LEDs are arranged in 3 axis as follows:
Port0 – Pin (32-39) used for X-axis followed by a pull-up resistors 10K
Port2 – Pin (21-28) used for Y-axis
pins 21 to 28 on the STC12c5a60s2 go to the enable pins on the corresponding of 8 x SN74HC573 latches.
The total 64 input pins of 8 Latches (74HC573) are connected to the 8 Data Port0 (P0.0-P0.7).
The 74HC573 is an octal D-type flip flop with latched.
The LE (latched enabled) are used for columns and the 8 outputs rows.
How 74HC573 works:
It’s works as a buffer and saves the last input data. With each plus at LE pin, the latch will read the data out of the µC and at the same time forward the previous saved data to the output.
The OE pin of each latch goes to ground to always make available the contents of the 8 latches at the outputs.
This is the best elegant way, that you can control the 64 piece LED individual with 2×8 Ports.
Port1 – Pin (1-8) Z- axis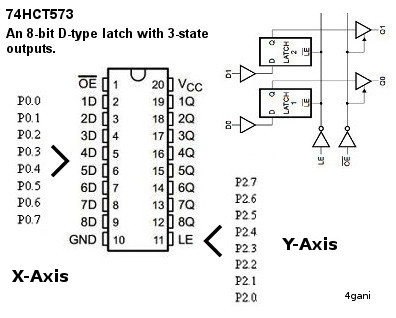
Pins 1 to 8 on STC12c5a60s2 are mapped to pins 1-8 of (u9) Darlington array ULN2803.
These lead via 470 Ohm resistors the Z-axis of 8 layers.
We know that the µC normally can maximal provide the outputs with ca. 20mA.
Loads more than 20mA will destroy it.
Therefore, it used a ULN2803 which provides each of his 8 x outputs with up to ~500mA to drive the Z-Axis through 470 ohm.
Cube funktionierte soweit okay. nun möchte ich µController new mit einer neuen Version flashen.
There are several tools that can be used to transfer the hex file (machine-code) to the STC microcontroller.
Actually, I can use the Keil µVision tool for Programming and compiling.
The Keil µVision demo Version has limitation regarding the size of binary, but it’s enough and works for me.
If we are going to flash the µC with a neu Hex-File, the STC-IPS tools will work completely for us.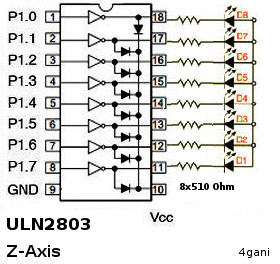
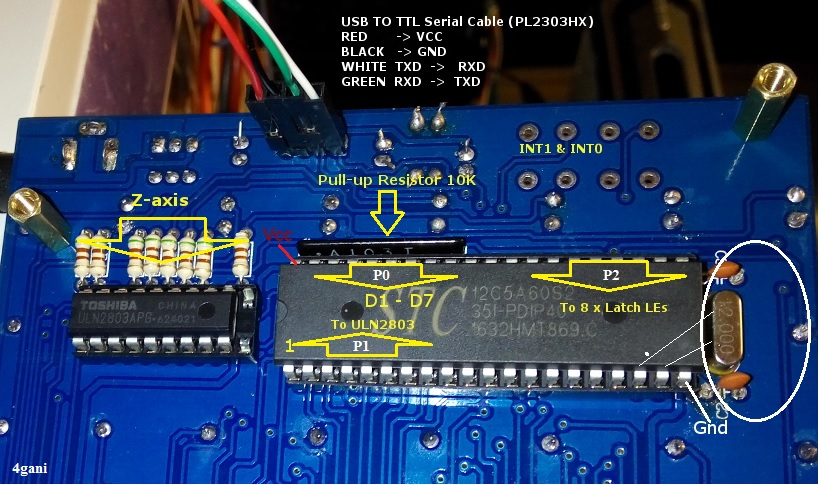
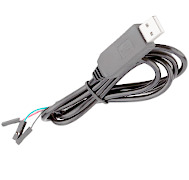
Note: The boot-loader can not be flash in Cube via MOSI/MISO port. We have to use the USB-seriell-Kabel (RX,TX, GND).
Firmware v2:
The new firmware can be flashed/burned to STC MCU through UART/serial connection.
I used the following stc-isp tools from china. this can be downloaded from here: http://www.stcmcu.com/STCISP/stc-isp-15xx-v6.85.zip.Programming the STC:
- Open the software tool stc-isp-15xx-v6.85
- Connect “USB to UART (TTL) Cable” to led cube serial pins (p30 <->RX and P31<-> TX)
- Click here to get for driver USB to UART (TTL) Cable.
- Select STC12C5A60S2 from MCU Type combo box
- Choose the correct com port of USB-TTL converter (you may check that in control penal > system)
Normally the port will be detected automatically by the tools. - Click “Open Code File” button and select the HEX file: e.g. ledcube8.hex
- Click”Download/program” and wait 5 sec. Now power on the cube board to start programming.
If all goes well and programming process is finished you should see LEDs display light up.
http://www.stcmcu.com/STCISP/stc-isp-15xx-v6.85.zip
https://github.com/tomazas/DotMatrixJava.
https://github.com/tomazas/ledcube8x8x8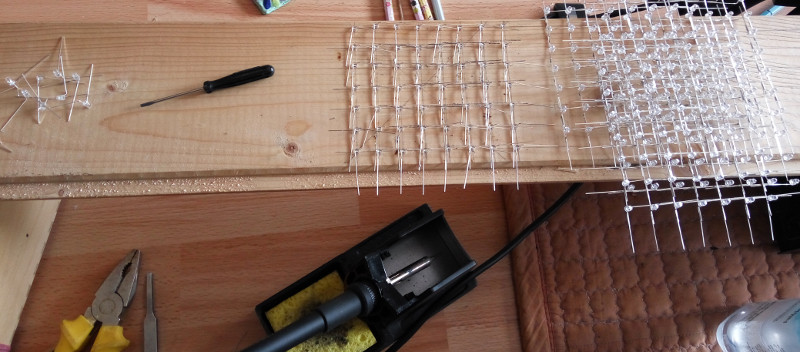
can anyone please send me the .hex file for the 8x8x8 cube? I’ve tried numerous times but the link provided is a no go, it say no longer available or please try later. It would really appreciate the help . thanks