
Solar energy monitoring with a Sonoff Basic (Blynk App)
(Visualize the data by using the Blynk app)
The goal is to get an opportunity to collect the information round the power of my solar system in real-time and to find out how efficient it is for long-term usage, and more.
This project is able to measure current by using a CT Sensor. Finally the data is sent via WiFi and can be displayed in a simple Blynk app on mobile.
I’m using Sonoff Basic for this project because I don’t have a DC power source for the ESP-12E module, so I can supply the Sonoff directly with 220V AC which comes from the micro inverter.
Code checked in to the GitHub repository under
https://github.com/forgani/sonoff-EnergyMonitor
Here is the list components of what I used:
- ZMCT103 (CT Sensor)
Current Transformer 5A / 5mA Sensor (Output Current 5mA at input 5A)
- Sonoff Basic R2
The Sonoff Basic is based on the ESP8285 WiFi chip. This chip is similar to the ESP8266 chip with 1 MB flash memory.
The ESP8285 uses an 32 Bit Xtensa LX106 core which is clocked at 80 MHz.
The main difference between the ESP8285 and ESP8266 is the 1 MB on chip flash. Therefore, the device is even smaller than ESP8266.
Both devices boot from an integrated boot-ROM that also includes some functions used by the SDK.
The ZMCT103 ac current transformer which I’m using has 1000 windings and can measure up to 5 Amps.
A resistor needs to be connected across the two terminals of the CT to allow a voltage to be measured across it , so that the AC output voltage is exactly 1V sine wave. The formulas here and the Tool for calculating burden resistor size can help.
On this occasion I used a 70.71Ω resistor, the output of the CT will be 1.0 Volts AC, for every 5mA of CT current (or every 5A of measured current).
My calculation procedure is as bellow:
5A/1000 (the count of windings) = 0.005A
1V/2 = 0.5V                     1V ESP8266 ADC reference voltage
0.5V/0.005A * 0.7071 = 70.71Ω   burden resistor
Measuring an analog voltage with the TOUT pin on a Sonoff Basic
ESP8266 has a single ADC pin available. ADC (Analog-to-digital Converter), TOUT, Pin6, A0 or Analog 0.
Since, as far as you know, no Sonoff uses the analog input of the ESP chip or will be made.
The TOUT pin (ADC) is definitely not connected, so my concern is that if I solder a wire to the TOUT, I can achieve my goal.
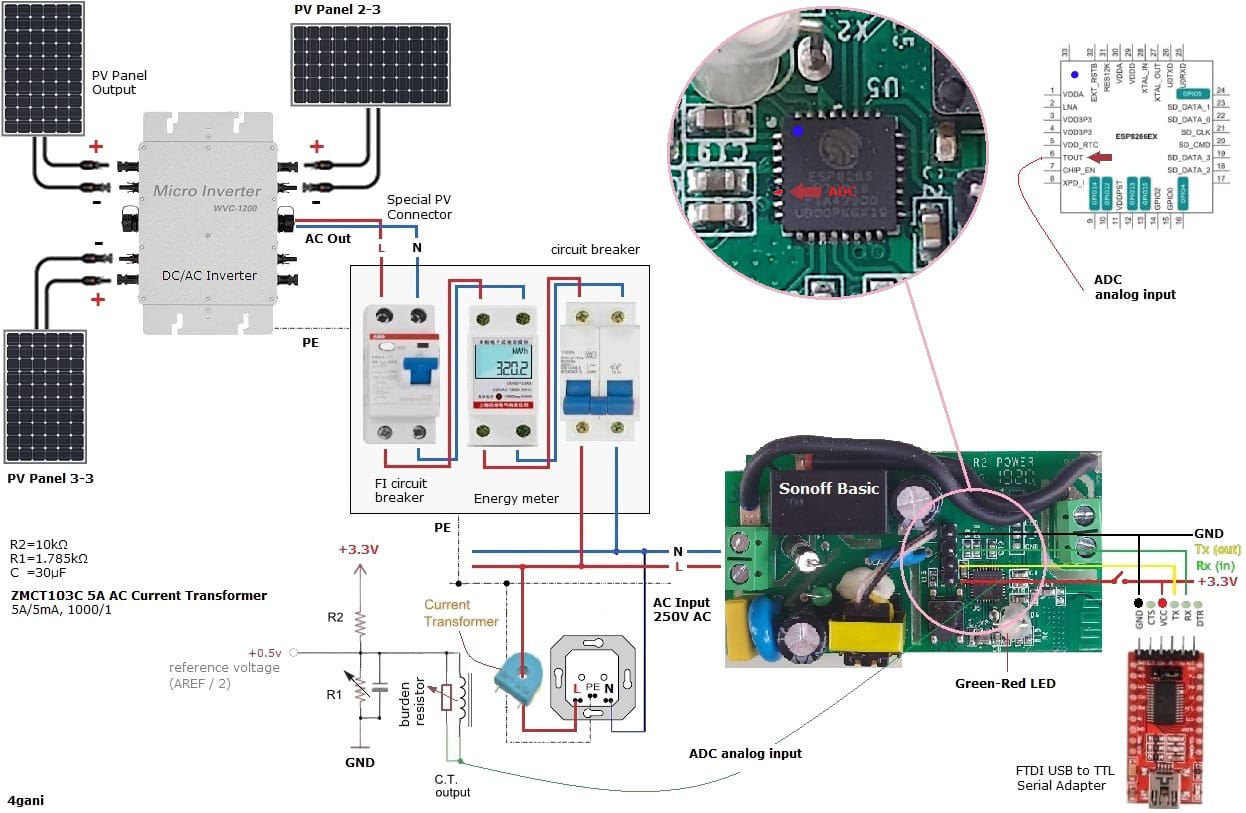
I opened the Sonoff and soldered a wire to the PIN number 6 named TOUT of the ESP8285 chip (see the diagram).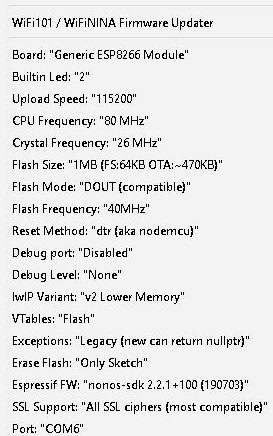
This TOUT pin’s functionality depends on what we program inside the module, and it can be used to measure any analog signal from 0V to 1V with an 10-bit resolution (0-1023). You can see in the above picture the pin I’m talking about.
This ADC input on pin 6 has a maximum input value of 1.0V. So I have to use a voltage divider to reduce 3.3v to 0.5v.
To get more information about this issue, please read my description in DIY Home Energy Monitor
We are able to program the Sonoff by using a USB to TTL Serial Adapter. This adapter is 3.3 volts compatible.
To flash a custom firmware to Sonoff Basic R2
Upload a custom firmware to Sonoff Basic using Arduino IDE .
(For programming the Sonoff you will find a lot of tutorial in web)
I’ve soldered 4 header pins, so that I can easily connect and disconnect wire cables to my Sonoff device.
To flash a new firmware to your Sonoff, you have to boot your Sonoff in flashing mode.
Configure Arduino IDE for Programming (see the diagram)
The steps are mentioned bellow: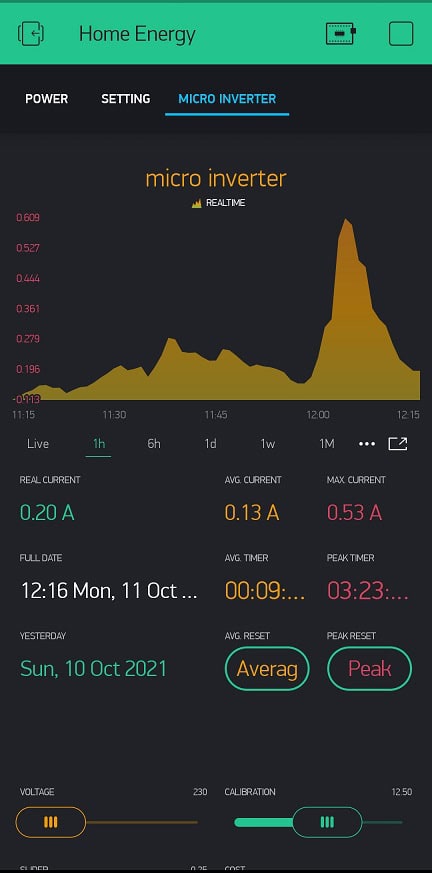
- Disconnect serial-to-USB adapter and power
- Bridge GPIO0 and GND (by pressing the on-board button or connection with a wire)
- Connect the serial-to-USB adapter to your computer
- After a few seconds disconnect GPIO0 from GND (release button)
- Select your FTDI port number under the Tools> Port
- Choose your ESP8266 board from Tools> Board > Generic ESP8266 Module
- Select Flash Mode: DOUT (Flash Size:1M, Flash Ferquency:40MHz)
- Press the Upload button
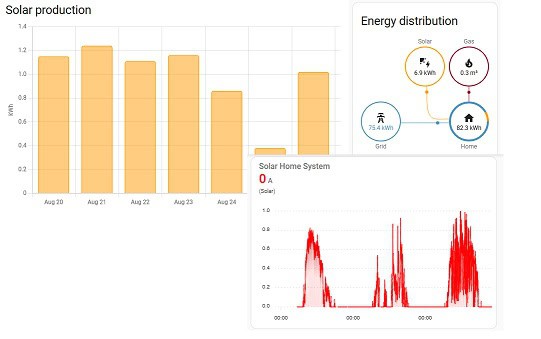
Since I have already switched to Home Assistant, I also reprogrammed this module so that I can integrate it into HA.
The code special for ESPHome has been uploaded to GitHub at: https://github.com/forgani/sonoff-EnergyMonitor
Hi,
I noticed you uses ESPxxxx for solar monitoring.
You can seek “SP7021”.
We have customers in EU which also use our CPU and boards for similar/same applications.
I saw your “About me”. My hardware coleague in Taiwan was also born in Iran. And I have CPU distributors in Korea/Germany/India.
Please Google “SP7021” . We sell it and provide FAE support.
CH Chang, sales marketing rep, Taiwan